What Are Barre Chords?
Barre chords are one of the most versatile type of guitar chords there is. Although not absolutely necessary to learn for all guitarists, it is highly recommended to learn how to play them as they open up a whole range of possibilities.
Barre chords enable guitarists to play chords in every key (from A – G) all the while keeping the exact same finger positioning. To further explain, every fret (from 1 – 12) on a particular guitar string produces a different note. Therefore, if you play a major barre chord using the low E string as your root note, then the name of that chord will be: (root note) major. For example, if we play a major barre chord using the 5th fret of the low E string as our root note, the chord would be called A major, since the note at the 5th fret is an A.
Now, as for the meaning behind the term “barre chord” this essentially refers to the act of having your index finger “barre” the strings of the guitar, similar to a capo. However, not all barre chords require that you barre all six strings. A barre chord that does barre all six strings is called a “full barre” while if your index finger is used to only barre down 2-5 strings this is called a “half barre”.
How to Make Playing Barre Chords Easier
For guitars who are just dipping their toes into the world of barre chords, they know that these aren’t the easier chords to play. They take practice and require that you build strength in your fingers (especially your index finger) in order to be able to properly play them without missing a beat.
However, although practice is a major part of it, there are a few tricks to help you speed up your barre chord learning process. A few ways to make playing barre chords easier include:
- Using lighter gauge strings – String gauge refers to the thickness or diameter of your guitar string. Choosing the best guitar strings can vary for each guitarist depending on their personal preference. However, light gauge strings will make it easier for you to press down compared to heavy gauge strings. If your guitar currently uses medium or heavy gauge, try swapping them out for a light or custom light gauge.
- Lowering your guitar’s action – A guitar’s action can play a major role in how easy it is to press down on a string, and more specifically, play a nice sounding barre chord. Action is basically the distance that exists between your guitar’s fretboard and its strings. The more distance, the is the harder it will be press down. If you feel as though there is a lot of distance between your fretboard and strings, you’ll need to make the proper truss rod adjustments.
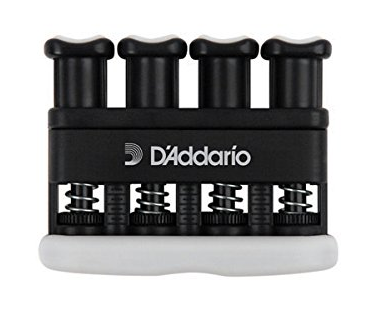
- Using a finger exercising tool – Lastly, to help build up strength in your fingers when you’re away from the guitar, you can use a finger exercising tool. This tool offers various tension settings allowing you to progressively build up the difficulty and thus increase strength faster.
Popular Barre Chord Shapes
There are many barre chord shapes that exist and it would make for a very long list if we were to mention them all. However, there are 4 very common barre chord shapes that exist and that you should know. These include:
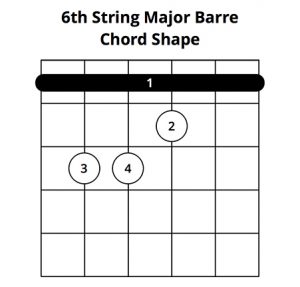
- The major shape using the 6th string as the root (Emaj shape).
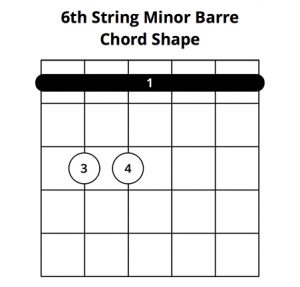
- The minor shape using the 6th string as the root (Em shape)
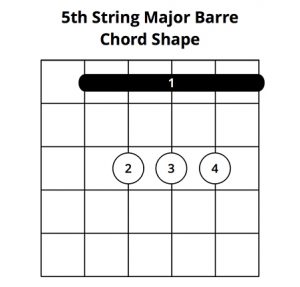
- The major shape using the 5th string as the root (A major shape)
- The minor shape using the 5th string as the root (A minor shape)
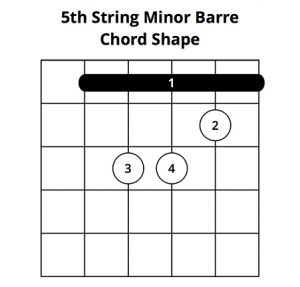
As mentioned above, these barre chord shapes can be used anywhere on the fretboard. Simply taking the root note on the 5th or 6th string (depending on which shape you use) will determine which key your barre chord is played in.
4 Barre Chord Exercises
Now that you know the 4 most popular basic barre chord shapes, here are a few exercises to help you practice playing them. When going through these, start with the first exercise and work your way to the last. You shouldn’t move on to the next exercise until you feel completely comfortable with the current one. Try practicing one of these exercises for at least 15 minutes per day.
- Exercise #1: The first exercise is to just start building strength specifically in your index finger. To do this, go to the 8th fret of your guitar and press down on the low E note (6th string) with your index. Pluck just that string. Next, use your index finger to press down on the 6th string and 5th string. Pluck both strings, one after another, but ensure each one rings clearly. Once that’s done, press down on the 6th, 5th, and 4th string using your index finger. Again, pluck each string individually ensuring that they each ring clearly (i.e. no muted notes or buzzing).Continue this exercise until you are able to press down on each of the six strings using only your index finger and plucking each string clearly. Once you’ve successfully completed this exercise at the 8th fret, move up the fretboard to the 7th fret and do the same thing. Continue repeating this exercise until you get to the 1st fret (this will be the hardest).
- Exercise #2: This exercise that I found on youtube is quite interesting and makes use of a slapping technique. Essentially, you place your fingers in the position of a barre chord (E major for example) and then slap the low E string a few times with your index finger and then the high E and B strings with your index finger. Once done, try plucking each string of the barre chord shape and listen for any buzzing.This is definitely an interesting exercise that has worked for many according to the video. Check out the whole video lesson here, where the instructor lays out exactly what to do.
- Exercise #3: This exercise is similar to exercise #1 however instead of just using your index finger, you want to also use your other fingers to make an actual barre chord shape. Let’s use the E major shape again and start at the 8th fret. You’ll want to be able to pluck each string without hearing any buzzing. Once successful, move up to the 7th fret, then 6th fret, and so on until you get to the 1st fret.
- Exercise #4: Once you build a little more confidence and skill in your barre chord playing ability, you can move on to this fourth exercise. In this exercise, you’re going to alternative strumming between the following:
– 6th string major barre chord
– 6th string minor
– 5th string major
– 5th string minor
Doing this will help build up your barre chord changing speed. You can start off with something relatively easy like A major – A minor – D major – D minor. But if you feel as though that isn’t challenging enough you can certainly change up the keys.
Additional Tips
To finish off, I wanted to leave you with a few additional tips that may help you along your barre chord learning journey. Keep each of these tips in mind as you play / practice your barre chords. A slight adjustment in your technique can be the difference between a muted barre chord and a crystal clear barre chord.
- Slightly tilt your index finger so that the side closest to your thumb is against the fretboard. This side of your finger is harder as it is right against the bone thus making it in most cases, easier to press down all of the strings.
- When you’re just starting out, you may find it useful to put your middle finger on top of your index finger to press down all of the strings. Now, of course, you can’t do this if you want to play certain barre chords however it will give you a little more reinforcement in the beginning stages.
- Check that your thumb is properly placed at the back of the guitar neck. You’ll want to use your thumb to create counter pressure between the fretboard and your fingers. The placement of your index finger and thumb around the guitar neck should resemble as though you were squishing a bug.
- Lastly, practice, practice, practice. I can’t stress this enough. Barre chords certainly aren’t the easiest thing in the world to learn however are definitely worth it once you get them right. They open up a world of possibilities in regards to the songs you’ll be able to learn and compose.
Do you have any tips on how to master playing barre chords? Let us know in the comments section below.


